21/12-05 | Henrik Olsson | milohenke@64bits.se
 Print this article
 CPU cooler
Now it's time to move onto building a gingerbread heatsink for the candy processing unit (CPU). The procedure is the same as before, that is make a model, flatten the dough, put the model in place, cut it out etc. Even the fan is built similarly to the one on the graphics card. The difference is the size of the bits of candy used, and that you need two round basset pieces.
The left image shows all the parts, aside from the fins of the fan, that are used to construct the fan itself. In the right photo we see the completed parts after we have pieced together the fan and retention. The model for the fan retention is made using a disassembled standard 80mm fan.
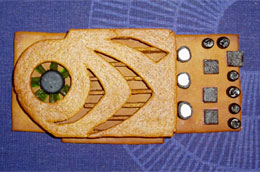
The cpu heatsink is reasonably simple to make because it only contains seven parts; the base and six fins. The fins are mounted relatively easily by gluing them onto the bottom plate. Once this is done, all that remains is to mount the fan on top of the heatsink. The easiest way of doing this is to just place the fan on top of the heatsink and avoiding gluing it. That way it minimizes any risk of damaging it while moving it. The other option is to wait until you have mounted the heatsink on the mainboard before you glue the fan in place.
RAM memory
Making the memory is perhaps the easiest part of the gingerbread PC construction. All that is needed is two pieces of gingerbread and a liquorice rod with a minty inside. They are called penguin rods over here. Open it up with a slice of a sharp knife and remove the minty stuff inside. Then cut it into 16 small pieces shaped like memory modules and glue them into place.
21/12-05 | Henrik Olsson | milohenke@64bits.sePrint this article
Diskutera denna artikeln i vårt forum!